How to Send Automated Emails with G-Lock EasyMail7
You Will Learn How to Create a Simple Autoresponder Series of Drip Messages
One of the easiest ways to dramatically impact your conversion rate is to engage with your users in a way that brings them back to your website. And one of the best ways by far is to obtain permission to contact them via email, then nurturing the relationship via a well-written, educational series that closes the sale.
You can send pre-written follow-up emails to your subscribers over time sequentially and automatically after they’ve subscribed to your list.
Automated email series improve your reader's experience and help convert prospects into customers. You can combine some of the following ideas into a single automated email sequence:
- free mini-course teaching people in your niche;
- helpful tips or educational series walking new users through your product or service;
- email series introducing readers to your blog archives;
- affiliate promotions, etc.
Using automated emails in EasyMail7 you can setup an email-based course for your contacts. For example, you can create a series of emails containing unique content and schedule the first one to go out immediately or in a few hours/days after the subscriber was added to your list or after any period of time has passed, the second – in 48 hours after the first one, the third – in 72 after the second one etc.
The best part is that after you set up an automated email series, you don't have to think about it again — EasyMail7 makes sure your campaigns get to your subscribers, right on time.
As far as you add new subscribers to the list, new subscribers will receive your email series starting from the first email.
Follow the steps below to create an automated email series in EasyMail7:
Step 1. Create Automated Email Series
Click on "Autoresponder" at the left pane in EasyMail7.
Click on "New" menu item.
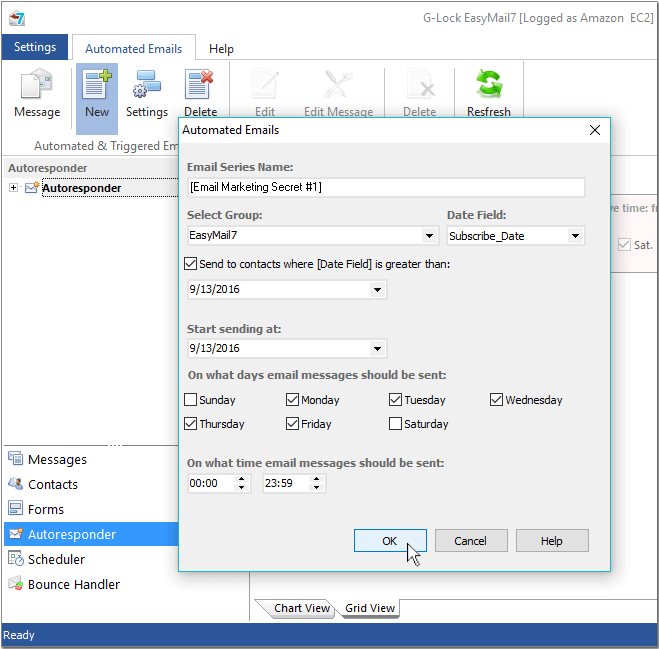
Fill in the fields:
Email Series Name – enter a name for the automated email series.
Select Group – select the group the program will send emails to. Important! You can select only one group at a time.
Date Field – select the field with the date when the subscriber was added to the list.
Send to contacts where [Date Field] is greater than: – check this option and choose the date if you want to send follow-up emails to contacts whose subscribe date is greater than the selected date. If you don't check the above option, the program sends the emails to all contacts in the group.
Start sending at: – choose the date when the program will start sending emails.
On what days email messages should be sent: – choose the days when automated emails will be sent.
On what time email messages should be sent: – choose the start time and end time when the program will start and stop sending automated emails on the selected days.
Click OK.
The automated emails series will be added to the "Automated Emails" section. By default it is Off. You will turn it to On after you add follow-up emails that the program will send to the group.
Step 2. Add Message to Automated Email Series
After you created the automated email series, you can add email messages to it.
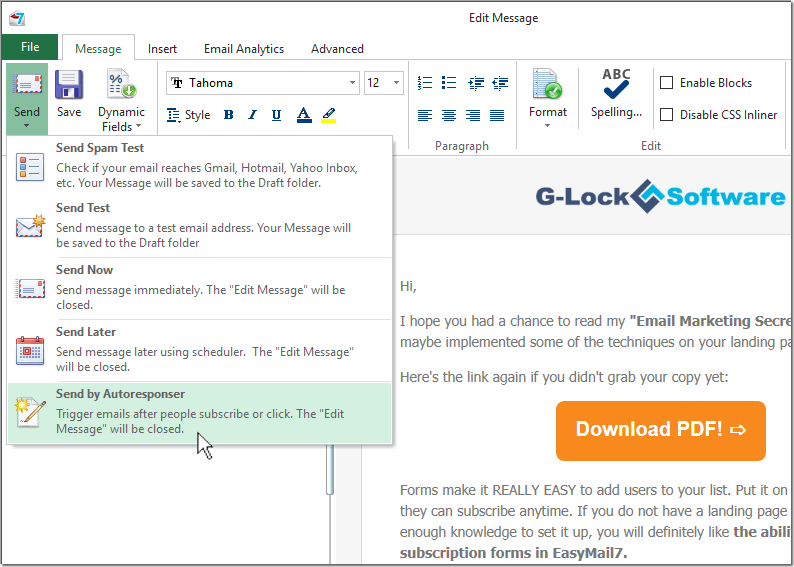
Click on "Message" on the menu bar and add the message content. Or, create the message from a template or draft.
Select the account you will send emails from in the "From" field. If you need to merge contact information into the message, in the "Group" field select the same group that you selected in the automated email series settings to be able to access the Merge menu.
Click "Send".
Select "Send by Autoresponder" from the "Send" menu.
Step 3. Configure Automated Message Settings
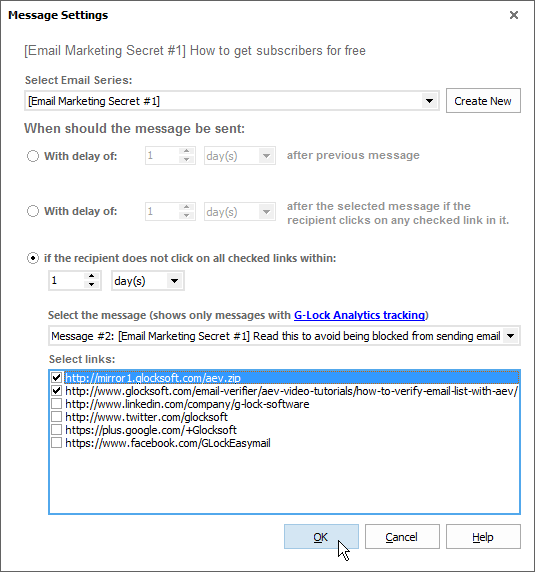
In the Message Settings you select the automated email series that will send the message and set the condition when the message will be sent to the group.
Select Email Series: – select the automated email series from the menu. You can click on "Create New" button to create a new series.
Choose when the message should be sent:
With delay of xx days (hours) after previous message – choose this option to send the message in xx days (hours) after the previous message.
If you are setting up the first message, it will be sent in xx days (hours) after the date you selected in the automated email series settings.
To send the message immediately, enter 0 into the days/hours field.

The following options can be used only if you track email opens and link clicks with G-Lock Analytics service:
With delay of xx days (hours) after the selected message if the recipient clicks on any link in it – choose this option to send the message in xx days after another message if the recipient clicks on any link in that message. Then choose the message where the recipient must click a link.
If the recipient does not click on all selected links within xx days (hours) – choose this option to send the message if the recipient did not click on the links within xx days. Then select the message and links. If the recipient clicks on the link that you did not select, the program will still send the message to the recipient.
You can use the above options to send the 2nd, 3rd, 4th etc. emails depending on the user's action on the previous messages.
Click OK to add the message to the automated email series.
Use the procedure above to add as many emails to the series as you want.
Step 4. Activate Automated Email Series
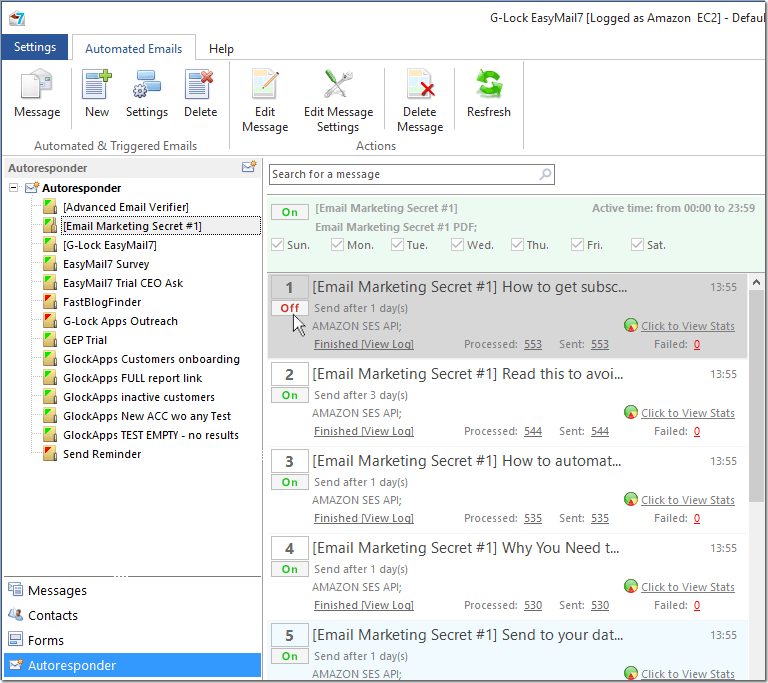
By default the automated email series is inactive and does not send emails.
Click on "Off" to turn it to On.
Click on "Off" for each message to turn them to On.
If the automated email series is Off, no messages will be sent even if they are turned to On. This is the fastest way to disable message sending by the series.
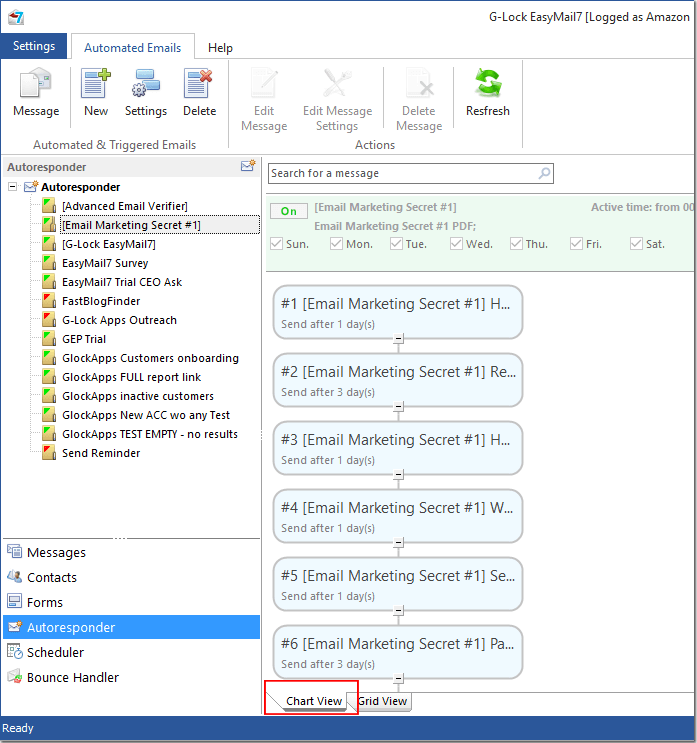
Grid View and Chart View of Automated Email Series
Messages in the automated email series are presented as a grid and as a chart. By default the grid view is active. In the grid view you have the automated email series on the top. The messages that the series sends are placed below.
You can see the automated email series name, group name it sends emails to, days and time when it sends emails.
If you click on the message, you can see the message content on the right panel. You can click on "View Log" and see the sending log for the message. Click on "Processed", "Sent" and "Failed" to see processed, sent and failed emails.
For your convenience, you can switch to the chart view of the automated email series.
Click on the "Chart View" tab at the bottom.
In the chart view you can clearly see and understand the algorithm of message sending by the automated email series. It is most useful if you set it to send emails based on link clicks in previous messages as you can quickly see the condition when each message is sent.
Manage Messages in Automated Email Series
You can edit the message content and settings in the automated email series. Plus, you can delete messages and change the order the messages will be sent to the subscribers.
To edit the message:
1. Click on the message in the automated email series.
2. Click on "Edit Message" on the menu bar. Or, click the right mouse button on the message and select "Edit Message" item in the menu.
3. Edit the message as you need.
4. Click "Save".
To edit the message settings:
1. Click on the message in the automated email series.
2. Click on "Edit Message Settings" on the menu bar. Or, click the right mouse button on the message and select "Edit Message Settings" item in the menu.
3. Edit the message settings.
4. Click OK.
To delete the message from the automated email series:
1. Select the message.
2. Click on "Delete Message" on the menu bar.
To re-order messages:
1. Click on the message.
2. Drag and drop the message at the desired place.
Edit and Delete Automated Email Series
To edit automated email series:
1. Click on the automated email series.
2. Click on "Settings" on the menu bar.
3. Edit the automated email series settings.
4. Click OK.
To delete automated email series:
1. Select the automated email series.
2. Click on "Delete" on the menu bar.
When You Should NOT Send Automated Emails
Though automated emails give you the nice opportunity to engage new subscribers and start building a relationship with them, we do NOT recommend that you send automated emails if:
1. More than a year passed since people have joined your list. You can schedule EasyMail7 to send automated emails in any number of days after a new contact is added to your list. But if you follow email marketing best practices, you will not need more than one year to establish a strong relationship with new subscribers.
2. You store contacts in an Excel database and you linked to it directly from EasyMail7. MS Excel is not a very reliable database and does not suit well for storing contact lists. For the correct work of automated emails, import your contacts from the Excel file into a group in EasyMail7, or export contact from Excel to a more reliable database such as MS Access and create a direct link to the MS Access database from EasyMail7.
3. Your subscribers may get more than one email from you the same day. If you setup more than one automated email series, make sure your subscribers will receive only one message from you per day. You won’t want to overwhelm people with your emails and push them to unsubscribe.
