How to Create and Use Online Subscription Forms in EasyMail7
According to best email marketing practices and the CAN-SPAM act, you can send email marketing emails only to people who subscribed to your mailing list and gave you the permission to send them emails. The easiest way to get email subscribers is through a subscription form on your website.
With EasyMail7, you can create subscription forms, place them on your website and collect email leads into the EasyMail7 groups in real time.
EasyMail7 allows you to organize a single opt-in or confirmed opt-in process. Below you can read about the pros and cons of the single and confirmed (double) opt-in processes and decide which one you would like to use for your leads.
Single Opt-In vs. Confirmed Opt-In
Single opt-in can grow your list quickly as it requires only one action from the subscriber. But at the same time, it has a higher potential to dirty your list.
If you’re building a list, you’ll want to make sure that you only have real email addresses from real people on your list. With single opt-in, you can have misspelled emails, fake emails, invalid and random email addresses owned by other people.
And a single opt-in process does not guarantee the subscriber’s engagement, at least at the beginning. If a new subscriber isn’t willing to open one email from you to confirm their subscription, then they probably aren’t going to be very engaged in the rest of the marketing communication with you.
Confirmed (double) opt-in is going to yield a much higher quality email list because it will eliminate invalid and fake addresses. Thus, it is going to reduce your email bounce rate and spam complaints.
On the other hand, some marketers think that confirmed opt-in breaks the smooth navigation of the website visitor and disrupts the process by having to open the email and confirm. Indeed, there are people who do not want to invest 30 more seconds to log into their web mail account or email client, wait for the confirmation email to arrive, click, see the second window, then return to the website.
Thus, while confirmed opt-in gives you peaceful sleep that no one will be able to abuse your form to subscribe other people without them to know about that, you can lose valuable contacts who would not like taking some extra steps to be subscribed to your list.
But there are also measures you can put in place to minimize the amount of fall off.
If you choose to use confirmed opt-in, have a guided process with customized “thank you” pages and specific instructions, instead of using the generic templates that come with a lot of autoresponders. Create verbiage on your “thank you” page that makes it seem like a next step or opportunity, not like an extra step or chore. Give your new subscribers some excitement.
Usually having an incentive can help improve confirmed opt-in performance. For instance, “Sign up for our newsletter and receive [incentive]”. This could be an exclusive whitepaper, ebook, infographic, report, bonus, maybe a discount code, whatever you can offer.
But it does vary from company to company – some may find that single opt-in is better than confirmed opt-in. It’s about you to test and decide what works best for you.
Now follow the steps below to create a subscription form in EasyMail7 and set up confirmed opt-in or single opt-in process.
Create Subscription Form
To create a subscription form, follow the steps below.
Go to "Contacts" in G-Lock EasyMail7.
Create a new group or select an existing group under "My Groups" and click "Edit" on the menu bar.
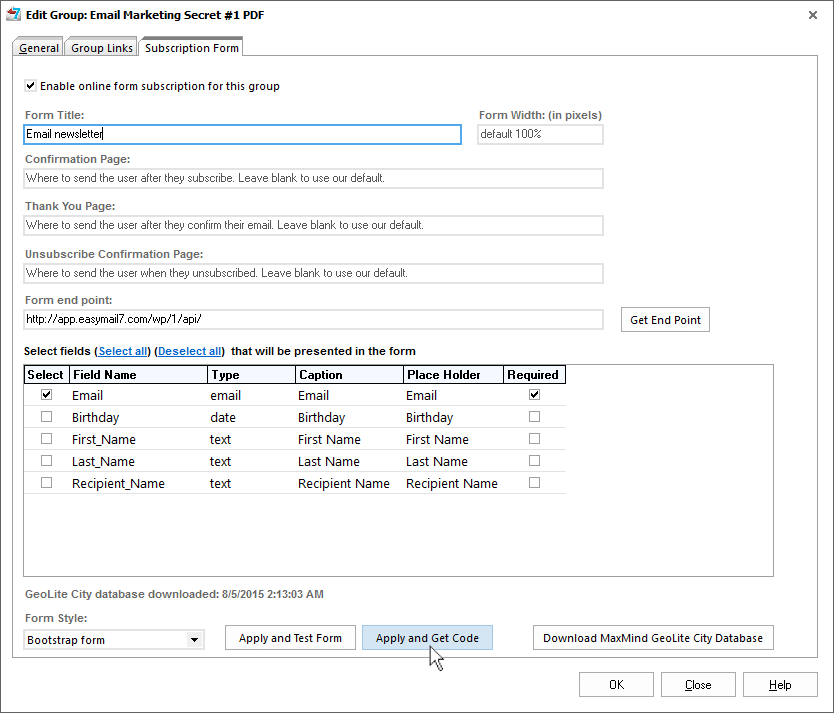
Go to the "Subscription Form" tab.
Check the "Enable online form subscription for this group" option.
Type a form title and indicate the form width in pixels.
If you have your custom confirmation page, "thank you" page and unsubscribe confirmation page and want the subscriber to see your custom action pages during the subscription process, enter the URLs of the pages. If you do not have custom action pages, leave these fields blank to use the default action pages.
From End Point – leave this field by default. If you install EasyMail7 on an Amazon EC2 instance and add the instance name to your DNS records, you can then replace the default domain in the End Point with your DNS record, for example, http://applic.easymail.com/wp/1/api/
Check the "Protect from Spam Submissions" option to avoid spam or bot submissions through the form. This option works if you keep the default scripts and use the ema-add-tracking-data parameter in the form code. In the example below the required scripts and parameter are marked by bold.
...
	<form ema-track="ShowForm/108" ema-add-tracking-data action="[form end point]AddEmail">
	    <input type=hidden name="groupid" value="108">
	    <div class="form-group">

...
	<!-- Misc Scripts -->
	<script src="http://cdn.easymail7.com/js/domain-validation.min.js"></script>
	 <script src="http://cdn.easymail7.com/ema.min.js"></script>
	     <script>
	         EMA.configure('[form end point]Event');
	     </script>
	 </div>
Select the form style.
Put the check marks to indicate the required fields on the form.
Click "Apply and Test Form" to preview the form online.
If the form looks well, click the "Apply and Get Code" button.
Copy the form code and paste it into the source of your landing page or page on your website. You can copy-paste the subscription form on as many pages as you want.
Customize Subscription Form
You can track any event by adding the tracking parameter to the element.
Add the ema-track="event name/groupid" parameter to the element to track an event at the form appearance.
Add the ema-track-submit="event name/groupid" parameter to the element to track an event at the form submission.
Add the ema-add-tracking-data parameter to the element to add tracking data to the form (to the body of the POST request) itself.
event name – your custom event name and groupid – unique group ID used in the form HTML code.
Example:
Below is a fragment of the from code where the ema-track parameter is used to track the form appearance and the ema-add-tracking-data parameter is used to track the form data.
...
	<form method="POST" ema-track="ShowForm/108" ema-add-tracking-data action="http://[form end point]/AddEmail">

   <input type=hidden name="groupid" value="108">

  <div>
	        <label class="control-label">Email</label>
	        <input type="email" placeholder="Email" name="Email" required class="form-control">
	    </div>

<div>
	      <button ema-track-submit="ClickSubscribe/108" class="btn btn-primary" type="submit">Subscribe</button>
	    </div>

   <div class="error-msg alert alert-danger" role="alert" style="display: none;">
	      <p>This is a form error message!</p>
	    </div>

   <div class="msg alert alert-success" role="alert" style="display: none;">
	      <p></p>
	    </div>
	 </form>
	...
Add ema-track-click="event name/groupid" to track an event at the element click.
Example:
In the example below the subscription form opens after the user clicks on the "Download" link.
Exclusive Bonus: Download our ‘Email Marketing Secret №1’ Ebook Today and Learn How to Triple Your Open Rates, Double Your Clickthroughs and Sell Up To 200% More With Email.
Below is a fragment of the form code where the ema-track-click parameter is used to track clicks on the "Download" link and the ema-add-tracking-data parameter is used to track the form data.
...
	<div style="background: none repeat scroll 0 0 #ff9; clear: both; margin-bottom: 18px; overflow: hidden; border: 1px solid #e5e597; padding: 13px;font-size: 19px;line-height: 28px;">

<b>Exclusive Bonus:</b> <a ema-track-click="Click Download EMS PDF/108" href="#modal" data-uk-modal><b>Download <i class="uk-icon-download"></i></b></a> our 'Email Marketing Secret №1' Ebook to learn how to better engage your subscribers via email, make your email messages "primary" and boost your open and click rate.

<div id="modal" class="uk-modal" style="display: none; overflow-y: scroll;">

<div class="uk-modal-dialog"> <a href="" class="uk-modal-close uk-close"></a>
	 ...

<form ema-add-tracking-data action="[form end point]/AddEmail" method="POST">
	       <input type="hidden" name="groupid" value="108">
	       <fieldset>
	 ...

<button type="submit" value="Send My PDF Now!" name="Submit">Send Me The Free Ebook</button>
	 ...
	       </fieldset>
	     </form>
Important! If the conversion rate is more than 100%, replace the default tracking code in the form HTML code
<script src="http://cdn.glockapps.com/js/ema.min.js"></script>
	 <script>
	   EMA.configure('http://applic.easymail.com/wp/1/api/Event');
	 </script>
with this tracking code
<script src="http://cdn.glockapps.com/js/ema.min.js"></script>
	 <script>
	   EMA.configure('http://applic.easymail.com/wp/1/api/Event',{forceSubmitTracking: true});
	 </script>
Replace http://applic.easymail.com/wp/1/api/ with your form end point.
Customize Email Templates
EasyMail7 is supplied with default email messages: confirmation email, welcome email, unsubscribe confirmation, and successful unsubscribe.
To set up a single opt-in process, turn the confirmation email to Off to skip it. You can send the welcome email to your new subscribers immediately after they subscribed. If you do not want to send any email thanking your subscriber immediately, turn the welcome email to Off as well.
You can customize default email messages for each form and list as you want.
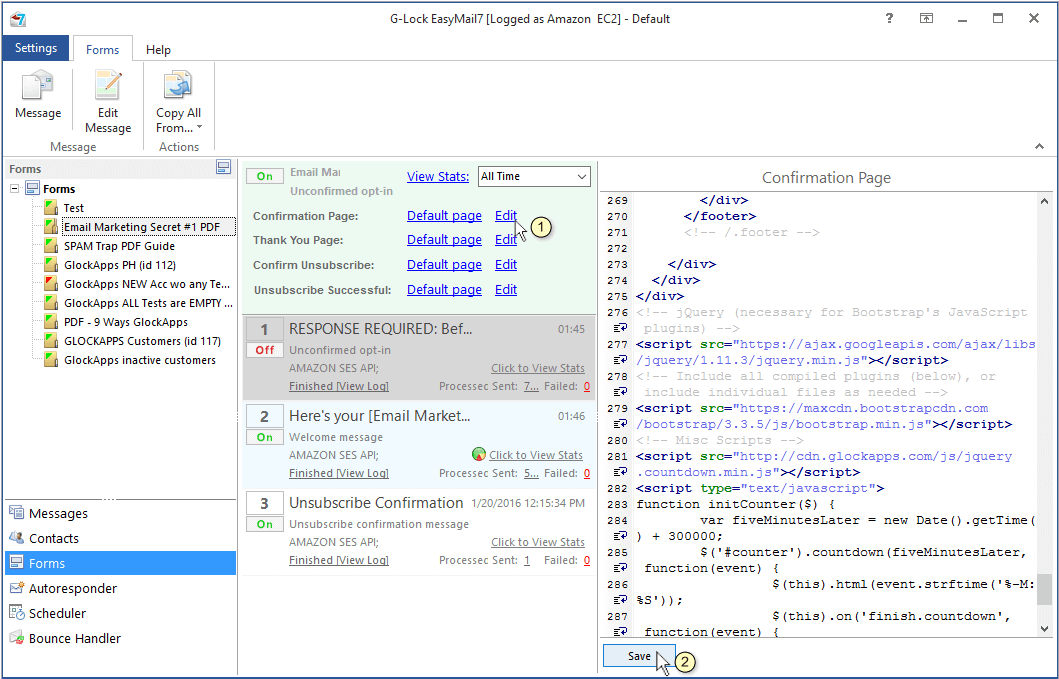
Go to "Forms" at the left side of the program window and click on the list name.
Turn the message to Off and click on "Edit Message".
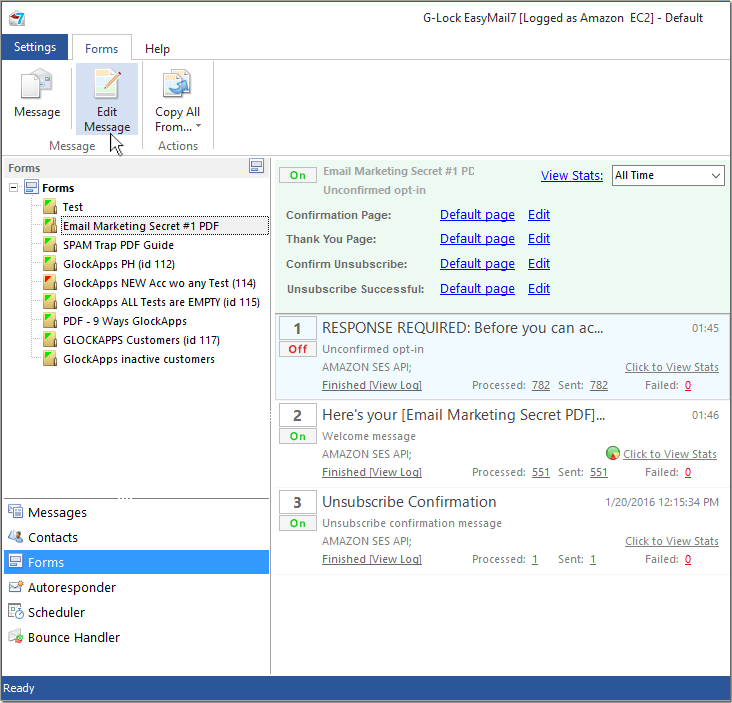
Select the outgoing mail account in the "From" field and customize the message if you need.
When the changes are made, click "Save" and turn the message to On.
Test Email Templates
To make sure that your transactional emails are delivered to the subscriber's Inbox, you can test them before you activate the subscription process.
To test an email template:
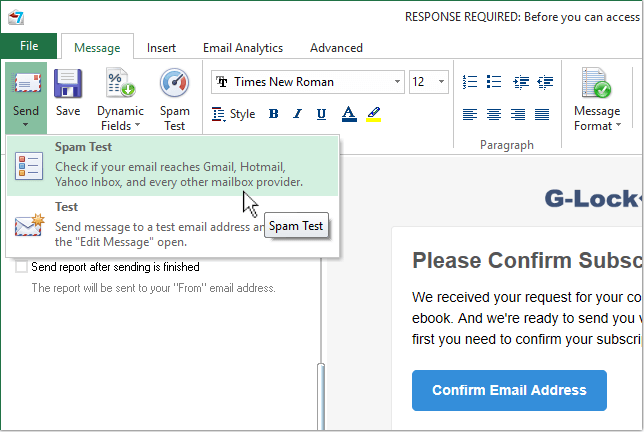
1. Turn the email template to Off.
2. Double click the mouse on the email template to open the editor.
3. Click "Send" and choose "Spam Test" or "Test".
The "Test" option allows to send the email template at one or several email addresses or to your test group.
The "Spam Test" option allows you to send the template to our seed list and check your email placement with major providers around the world.
Customize Action Pages
EasyMail7 is supplied with default action pages used in the subscription process: confirmation page, "thank you" page, unsubscribe confirmation page and unsubscription successful page.
If you do not have your own action pages you could use in the subscription process, you can customize default action pages for each form and list as you want.
Go to "Forms" at the left side of the program window and click on the list name.
Click on "Default Page" to view the default action page.
Click "Edit" to edit the page.
Make the changes to the page source and click "Save".
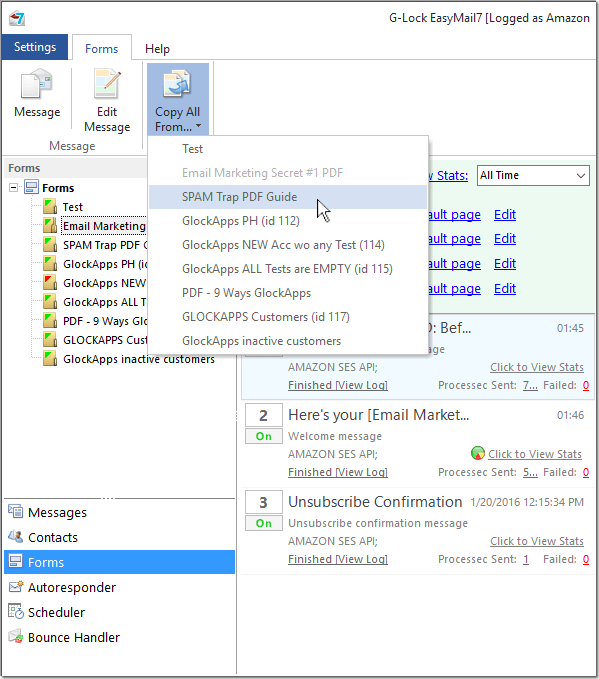
Copy Email Templates and Action Pages from One Form to Another
If you created nice email templates and action pages and want to use them for another form, you can copy them to that form.
Put the mouse on the form from which you want to copy email templates and action pages.
Click on the "Copy All From…" option on the menu bar.
Select a different form.
The copy operation has no UNDO action.
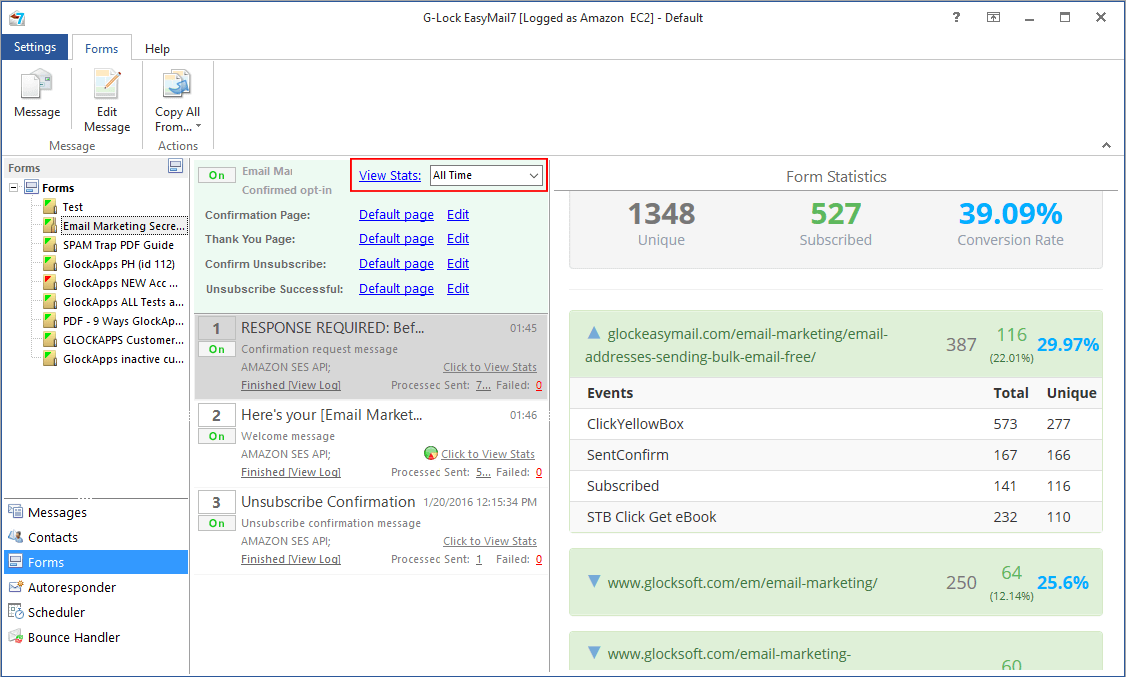
View Form Statistics
EasyMail7 collects the form conversion statistics.
To view the form statistics, click on "View Stats".
You can choose to view statistics for All Time, Today, Yesterday, This week, Previous Week, This Month or Previous month.
The statistics overview presents:
Unique – number of unique visitors.
Subscribed – number of subscribed users.
Opt-In Conversion Rate = (subscribed_users/unique_users)*100%
Opt-in conversion rate refers to the percentage of site visitors who subscribe to your email list. Opt-in by its very nature, is voluntary. So site visitors must be given ample reasons to share their email address with you. An opt-in rate (or conversion rate) of anywhere from 1-5% is considered average, with 5% being exceptional.
There are a number of ways to increase opt-in rates. You can use a squeeze page, which presents a focused and convincing argument as to the benefits that they will receive by subscribing to your list.
Another method to increase your conversion rate is to use a pop-up tool. This tool will place your offer right in front of your site visitors, so they can't ignore it. They could close it, but not before seeing your offer. If you include compelling reasons to subscribe in this small pop up window you should see your opt-in conversion rate increase significantly. Applying a few email marketing tips can help grow your business.
Plus, the program shows the following statistics for each page where you put the subscription form:
1) number of page visitors;
2) page conversion rate (page_subscribed_users/total_subscribed_users)*100%
3) form conversion rate on the page (page_subscribed_users/page_visitors)*100%
In addition, the program tracks the following events for each page with the form:
ShowForm – the number of times the form was shown.
SentConfirm – the number of sent confirmation emails.
Subscribed – the number of users who confirmed their subscription.
If you track custom events, you will see the statistics for custom events in addition to default events.